| View previous topic :: View next topic |
| Author |
Message |
Wandering Willy
*******
Joined: 18 Jul 2007
Posts: 1016
Location: Norfolk
|
 Posted: Sat Nov 03, 2007 12:23 Post subject: Dashboard Posted: Sat Nov 03, 2007 12:23 Post subject: Dashboard |
 |
|
With the shorter days I noticed that the hazard warning light switch doesn't have a light in it. The other switches all seem to be illuminated so I guess there is a little bulb to replace.
On the same subject, with a fancy dash like this, there are various areas to poke around in if you know how to pop out the relevant plastic panel or how to pulll the switches out to check bulbs (as here) or test wiring etc. Does anyone have any ideas on what parts are easy to access and which ones require the whole dash to be dismembered?
For example, the panel I need to remove (it contains the central diff lock switch as well as the hazard warning lights) has a mirror image panel on the other side of the central console which just pulls out if you put a small blade down the side of it and lever gently. This exposes some of the retaining screws for the console but otherwise there is just an empty space there.
In case you are wondering why I am interested in lighting up this switch it's because I live on a badly lit road and generally back into my (narrow) drive which takes a few minutes manoeuvring so I put the hazard warning lights on to draw attention to the fact that I am an obstacle to passing traffic. Without the switch being illuminated it takes a few seconds to find.
Help/advice appreciated
Willy |
|
| Back to top |
|
 |
Google
Sponsor

|
| Posted: Sat Nov 03, 2007 12:23 Post subject: Google Ads keep this community free to join! |
|
|
|
|
| Back to top |
|
|
Mixture Rich
*
Joined: 17 Aug 2007
Posts: 34
|
| Posted: Sun Dec 02, 2007 14:24 Post subject: |
|
|
Willy,
Did you ever get to replace that bulb? I've the same issue - last week I had to stop on the road in the dark to open a gate and I couldn't find the bloody hazard warning button.
Mixture |
|
| Back to top |
|
|
Wandering Willy
*******
Joined: 18 Jul 2007
Posts: 1016
Location: Norfolk
|
| Posted: Sun Dec 02, 2007 15:18 Post subject: Nope |
|
|
Hi Mixture
No - still figuring.
However, I'll PM you a document which might help get at the switch, so check your email.
Willy |
|
| Back to top |
|
|
Wandering Willy
*******
Joined: 18 Jul 2007
Posts: 1016
Location: Norfolk
|
| Posted: Mon Dec 03, 2007 17:11 Post subject: Dash II (Revenge of the little plastic light bulbs!) |
|
|
I've taken the plunge and prised open the central console on the dash of my car - the bit that surrounds the radio.
I have some photos if I can find a way to attach them to this email. Any advice on this (Mr. Moderator, please) would be appreciated.
The plastic surround to the radio is held in by 6 - 8 spring clips and it can be prised up using the end of a couple of table knives or similar thin bladed knives. The clips are reluctant to release their grip so more than one knife is required but it isn't a muscle job.
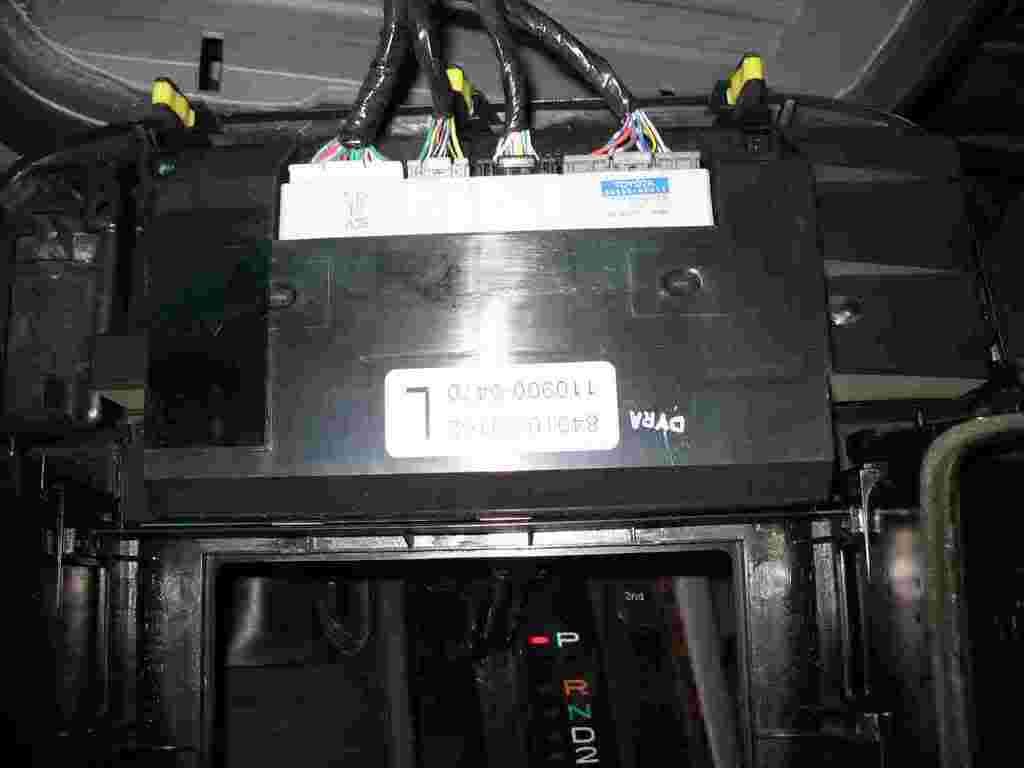
The cover includes 4 sets of wires which attach to its lower edge. These are then unplugged from the circuit board in the cover (1 of 3!).
This is more like dismantling a computer or stereo than changing a tyre so you have to take it carefully.
The lower part of the cover has a plastic cover on the inside which is held on by 5-6 small screws.
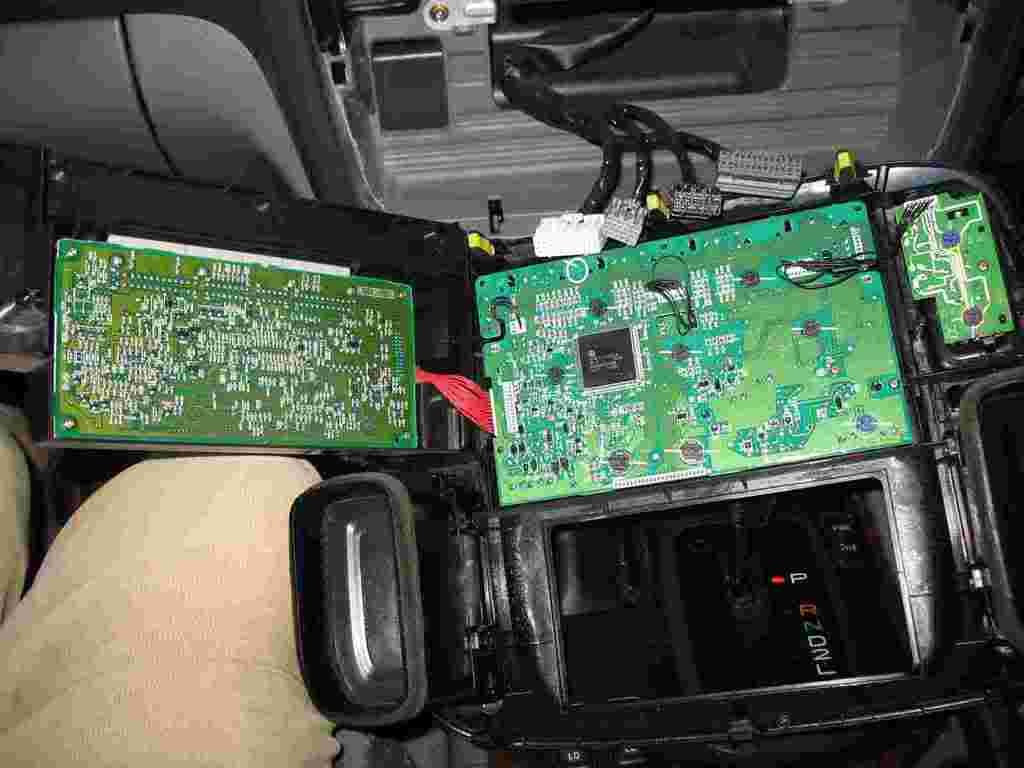
The inner cover carries a circuit board which is linked to a second circuit board by about 15 fine wires which allow it to be folded over towards the passenger's side. This exposes the remaining circuit boards - one large and one small.
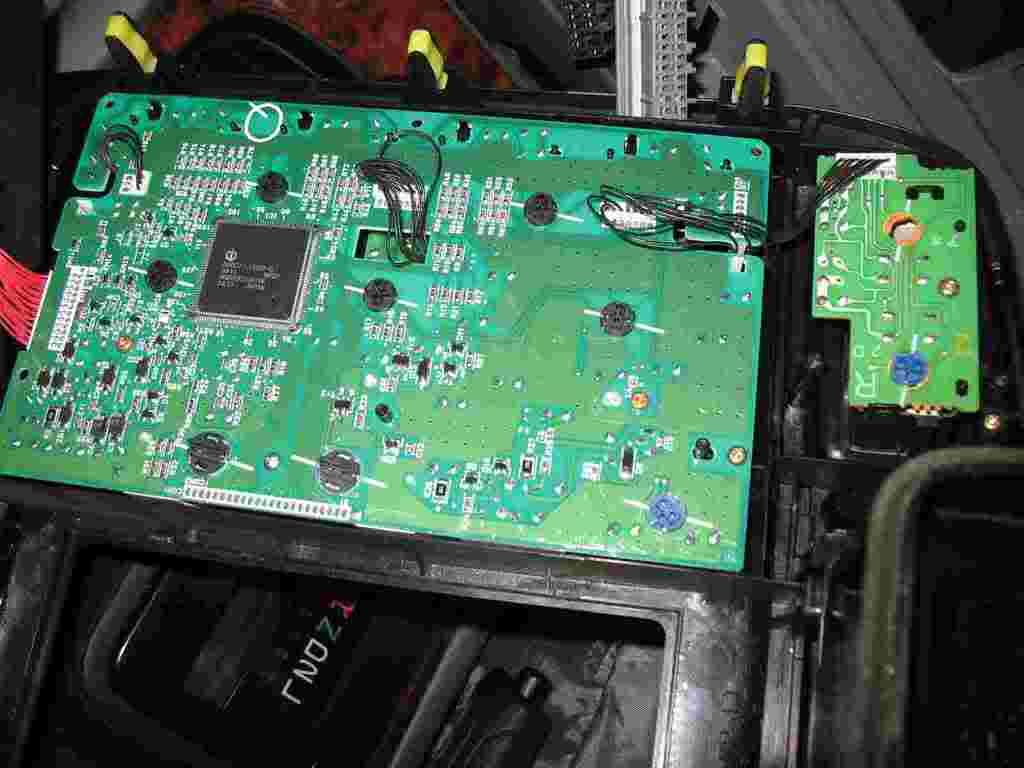
The larger circuit board carries a processor like a laptop computer so some care is necessary to avoid static damage to it.
There are about 8-10 small bulbs mounted in the 2 circuit boards using plastic bayonet clips (like domestic light bulbs). The lamps have green rubbery covers and are probably rated at about 1 watt. Two of the bulbs are a little larger but similar in design.
My problem is/was that the light for the emergency flasher had failed. I stole one from the switch for the central diff lock switch till I can get a replacement and gently put the whole assembly back together until the new bulb is obtained.
I haven't seen a similar bulb before so it may be necessary to get some from Toyota. I will try the usual alternatives but may have to accept Toyota's price.
I hope this helps and will provide my photos if I can find out how to attach them
Willy |
|
| Back to top |
|
|
Mixture Rich
*
Joined: 17 Aug 2007
Posts: 34
|
| Posted: Tue Dec 04, 2007 9:28 Post subject: |
|
|
Willy,
Thanks for your advise on this matter. I plan to tackle this tonight and I guess I will go to Toyota for the bulb. The last bulb I changed was for the seat heater switch and Toyota charged me 8 for the replacement. |
|
| Back to top |
|
|
Wandering Willy
*******
Joined: 18 Jul 2007
Posts: 1016
Location: Norfolk
|
| Posted: Tue Dec 04, 2007 12:28 Post subject: Toyota Bulbs |
|
|
Having done a search on the internet without success, I went to my Local Friendly Toyota Dealer this morning for a replacement bulb (well, I decided to get 2, one as a spare).
The twelve year old who served me had never seen a bulb like it before in his life. After having checked with several more experienced colleagues (two 18 year olds on day release from the local young offenders centre) he admitted that there were none on the premises. He offered to order some from Toyota Central and for the miserly sum of £4.48 they will be rushed from a far land for me to collect in a week's time.
So, after spending my morning explaining what a light bulb is and parting with good money (only double what you would expect to pay anywhere else) I can repeat the experience in a few days when another junior trainee executive is on duty.
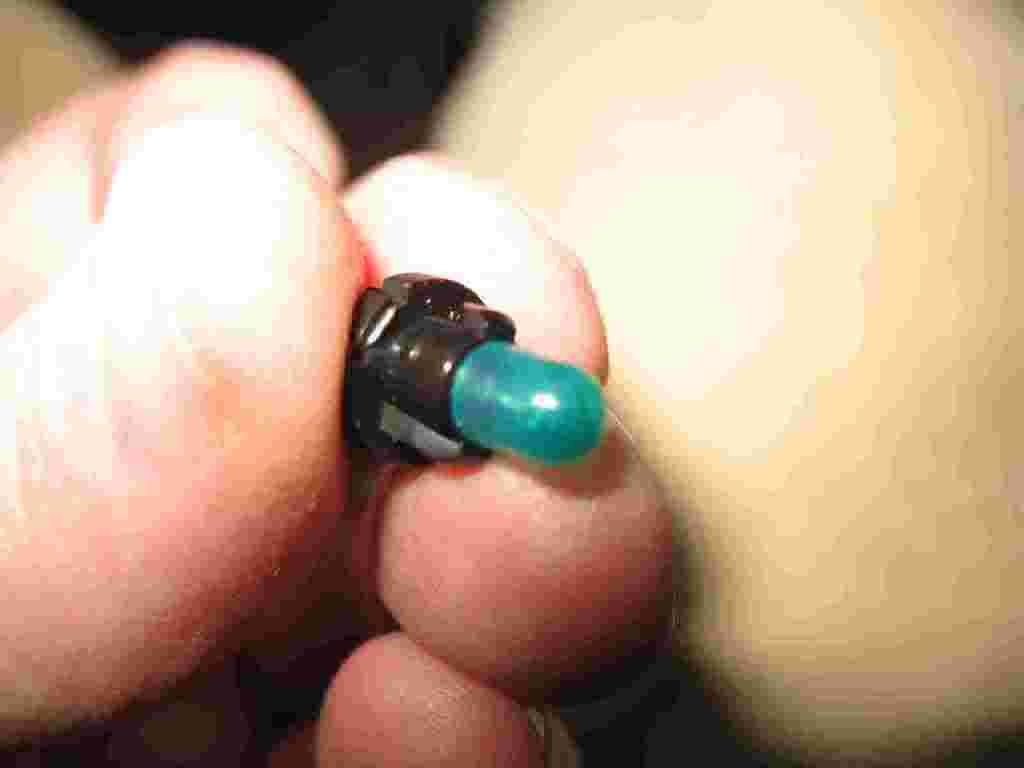
If it's of any interest, the bulb has a green translucent cap on it to reduce the light output and tint it green (obviously). However, I thought the cap was an integral part of the assembly but I have managed to slide it off exposing the standard bulb underneath. There is possibly a business opportunity here if I can find a way to unstick the bulb from its plastic base and replace it with a standard (Halfords 49p) 1 watt bulb.
Willy |
|
| Back to top |
|
|
Wandering Willy
*******
Joined: 18 Jul 2007
Posts: 1016
Location: Norfolk
|
| Posted: Thu Dec 06, 2007 9:49 Post subject: Photos |
|
|
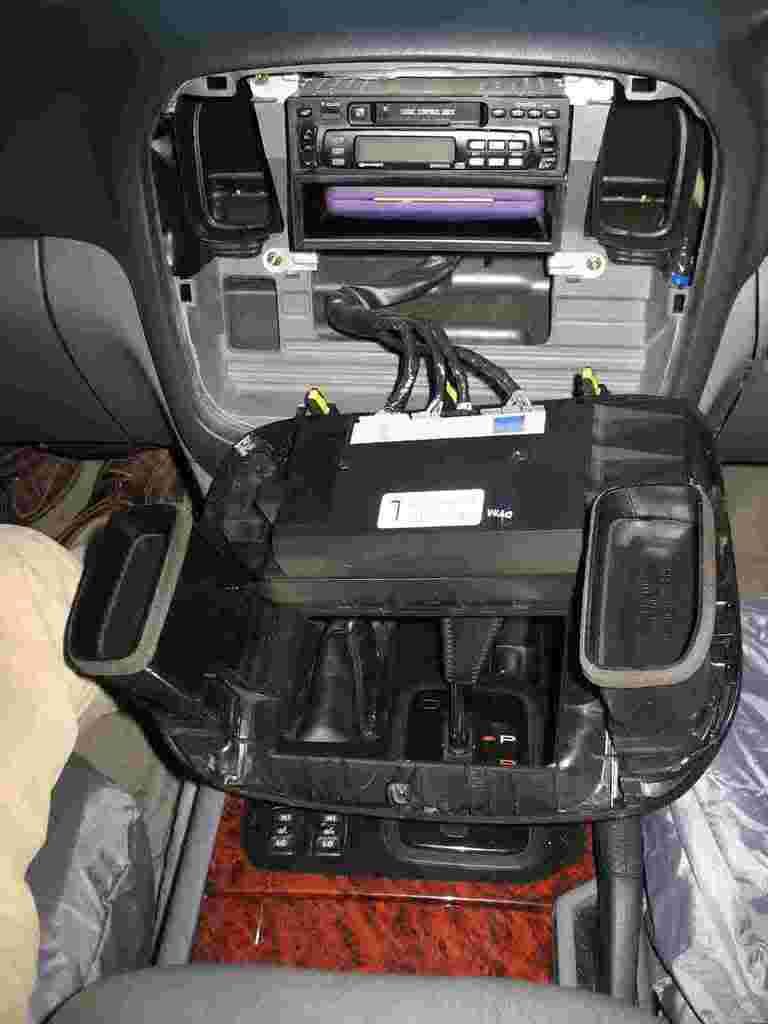
A few days ago, I tried to replace a broken bulb in the central console of the dashboard. I took a couple of photos as a record of what to do (my memory is pretty awful and I use the pictures as a reminder).
Joinerman was good enough to send me the details of how to load the pictures into a post so here is my first attempt.
The following pictures show the console prised out of the dash using a couple of table knives followed by the stages of opening the dismounted assembly to get at the bulb. I hope the pictures help anyone else attempting this repair.
Please note my cautionary comments posted earlier about damaging the console or the circuit boards if attempting this.
Willy
__________________________________
IMG]http://i267.photobucket.com/albums/ii310/WanderingWilly/Dash031207h.jpg[/IMG] |
|
| Back to top |
|
|
Wandering Willy
*******
Joined: 18 Jul 2007
Posts: 1016
Location: Norfolk
|
| Posted: Thu Dec 06, 2007 9:52 Post subject: Bulb |
|
|
Here is a picture of the bulb. Most of them on this circuit board are this size and type but there are also two slightly larger ones (behind the heater controls?)
Willy
______________________________________
 |
|
| Back to top |
|
|
Wandering Willy
*******
Joined: 18 Jul 2007
Posts: 1016
Location: Norfolk
|
| Posted: Thu Dec 06, 2007 11:47 Post subject: Bulb Update |
|
|
See above for snotty post re my local 'Friendly Toyota Dealer'
The bulb supplied is the wrong one!
I was foolish enough to have shown the broken bulb to the 12 year old. He ordered a bulb and I then collected it.
I didn't check that the new bulb was the required part. If I had checked while at the garage I could have saved myself a return trip (22miles?)
The garage has one of those really 'friendly' now press 2, then press 9 type telephone systems. Problem is that the 12 year old is never there to answer it so after an amusing time pressing buttons, the system tells you to go away and stop being a nuisance.
Don't you just love car dealers?
Willy
PS The supplied bulb is the larger type used in the circuit board so I suppose I have a handy spare for the day when these go phut. |
|
| Back to top |
|
|
DaveN
*******
Joined: 14 May 2005
Posts: 1190
Location: Sweden
|
| Posted: Thu Dec 06, 2007 18:48 Post subject: |
|
|
| You have to take your old bulb with you and match it up with one from their stores. There are loads of different types, and the parts lists either don;t list any, or list the wrong ones. I found this out the hard way also. |
|
| Back to top |
|
|
radiomans
*
Joined: 06 Aug 2005
Posts: 48
Location: Bury, Lancs, UK IO83UO
|
| Posted: Thu Dec 06, 2007 19:15 Post subject: |
|
|
Hi
@Willy, can u plz put up a pic of the other end of that bulb ?
i think i might have just what u need !!
Howard
PS:
is the glass of the bulb about 10mm long ? also are the wires pushed through the holder and then wraped over ?
_________________
1996 Prado 3.0td TX Auto LWB Import on 100% veg oil |
|
| Back to top |
|
|
joinerman
*******
Joined: 11 Sep 2005
Posts: 2200
Location: Here & there
|
| Posted: Thu Dec 06, 2007 20:24 Post subject: |
|
|
Look like christmas tree lights to me LOL
Joinerman |
|
| Back to top |
|
|
andy
Moderator

Joined: 16 Dec 2003
Posts: 2260
Location: Polegate, Sussex, England.
|
| Posted: Thu Dec 06, 2007 21:36 Post subject: |
|
|
The ones in a Surf look like this.
http://www.showmesome.info/hilux/workshop/dash.htm
_________________
It's Not a Bl**dy Jeep it's a Landcruiser
150 series Invincible X
100 Series VX Limited
Mercedes Sprinter 311 Luton
1993 VX80 4.2td SOLD
1996 Hilux Surf SSR-G Intercooler Sold
1994 Hilux Surf SSR-V Sold |
|
| Back to top |
|
|
Mixture Rich
*
Joined: 17 Aug 2007
Posts: 34
|
| Posted: Fri Dec 07, 2007 10:31 Post subject: |
|
|
Willy,
Thanks for posting the photos, they were very helpful.
I took the panel out last night and located the bulb. When I removed the bulb I noticed that the copper contact wire on the bulb base was displaced. Using a screwdriver I pushed it back into place, refitted it and now it works fine.
Thanks again for your help.
Mixture |
|
| Back to top |
|
|
Wandering Willy
*******
Joined: 18 Jul 2007
Posts: 1016
Location: Norfolk
|
| Posted: Fri Dec 07, 2007 13:38 Post subject: Thanks |
|
|
Thanks for your comments.
I will try to load a photo of the back of the bulb but for now the key dimensions are:-
Diameter of hole in circuit board = 6mm
The bulb passes through the circuit board by 10 mm
The base of the bulb is 10mm diameter (not important but might help differentiate it from other similar bulbs).
The bulbs shown in the Surf link provided by Andy look very similar.
There are no exposed wires (unfortunately) so replacing the lamp part of the bulb is not straightforward.
I'll try to get the bulb photos loaded this evening but I am having a problem with the strong winds at present so it will not be done till later.
Willy |
|
| Back to top |
|
|
|


